

If you follow me on Facebook, you know I’ve been knee deep in kitchen renovations all week. We are getting a boxer puppy on Tuesday, and wanted to take care of certain things before he arrives. Things like having a kitchen floor that is so ragged and hole-y, it’s uncleanable, and things like not being able to open the back door because it’s blocked by the kitchen floor linoleum we bought last July and never got around to installing.
Have I told you about my kitchen?
It’s small, but it’s bright. It’s actually set up very conveniently. It has wonderful tongue in groove pine panel walls. But it’s . . .
Well, here.

It used to be worse. It used to have lots of wretched cabinets, dark and decrepit, which I tore out a few years ago and replaced with shelves. You can read about that here. Damien replaced the horrible rusty fluorescent ceiling light with a pleasant glass domed light, and I bought an island and a hutch.
But the ceiling. The ceiling was just blah acoustic tiles that tended to droop, until one day a whole section just fell right off. So I swathed the whole room in plastic

and ripped the rest of the tiles down just to see what was under it.
I found all kinds of stuff in there.

including . . . stamped tin!

Some of it was in tough shape, but I said to myself, “We can restore it! It could be so beautiful!” And I kept saying this for three years. After a while I bought some poster board and a staple gun at Walmart and covered the worst holes.
Then we I bought some vinyl flooring, and people kept saying, “Oh, you’re replacing the floor? Not . . . not the ceiling?”

Whatever! Shut up! I knew I could do a floor. The ceiling, I was starting to have my doubts.
So this brings us up to the current day, with an immanent boxer pup. I chose rolled vinyl flooring instead of stick and peel tiles because our floor is wavy, man. Not just “tee hee, if you drop a marble, it goes under the table!” but like you have to fight to open the refrigerator door, it’s so uphill. But only in some places! With all this undulation, individual tiles would get torn up in no time and the cracks would be jammed full of macaroni and graham cracker sludge. So I thought a big roll was our best bet.
Last Friday, we moved everything out of the kitchen. The dining room and living room now looked like this:


But don’t worry, there was a lot of fruit in there, and it went bad! Hooray! And everyone was mad because it was hard to walk! So I moved out all the stove and the island and mini fridge and everything (the main fridge could not be moved out of the room, for reasons that are still too painful to discuss), and then it looked like this:

Marvin the Martian voice: Isn’t that lovely, hmmmmmm?
So I says to myself, I says, never mind the floor; these walls are disgusting. They need paint. I could paint later, but then I’d have to move all this crap out of the kitchen and back into the kitchen a second time. So fine, so I bought a few gallons of paint. Glidden “Frosted Lemon,” very nice. It was one of those “there’s no possible way this won’t be an improvement” situations

so I didn’t bother painting the trim a different color. Heck, I didn’t even bother getting all the bugs out of the way. Now they’re frosted lemon bugs. I may have painted over a lump of butter that was on the windowsill, because screw you! And I got it all done in one day.
Then the next day was finally floor day. FLOOR DAY.
This is the floor:

Here, have a close up!

Here, have an AUGGHHHHHHHH

So many layers of flooring, maybe we actually have cathedral ceilings and just never knew it!
There was this wedge shaped block of hard wood that’s absolutely cemented to the floor, reasons unknown. Possible shim, but placement makes this dubious. Possibly the cornerstone holding the house up.

(I later discovered that Damien had once stuffed a bunch of steel wool into a mouse hole and nailed a block over it. It was working, so I left it alone.)
There was a hellmouth:

ayund a secondary hellmouth:

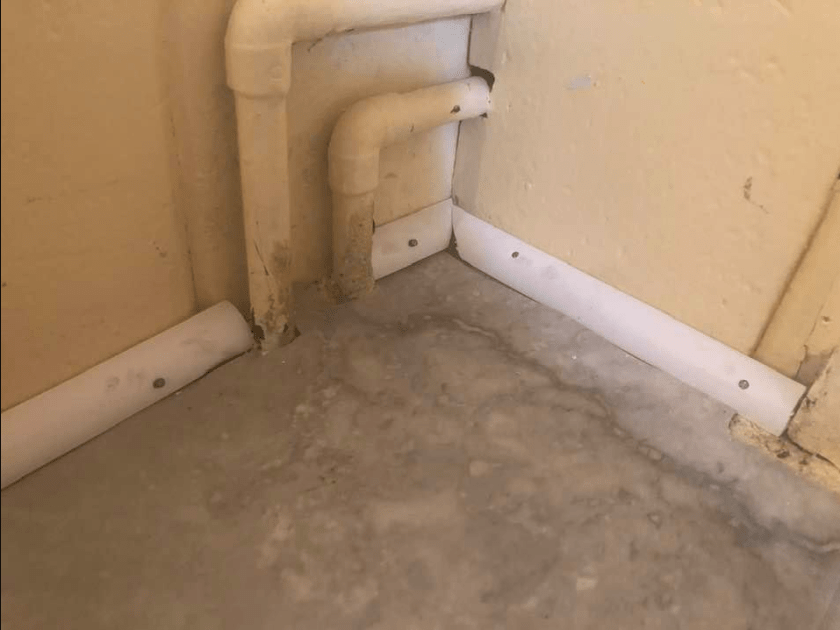
They had never put any kind of trim along the edges of the old linoleum, so what was still intact was curling and crammed with old crumbs and debris. The worst part was under the sink. Some of the floor had never been covered with anything, and there was also spot where they decided walls don’t need to go all the way down:

So I pulled and scraped away as much as I could and make a clean edge.

I had a short come-apart over the possibility of asbestos, but decided it was too friggin late, and I would just breathe shallowly and get it all sealed up as soon as I could. This blog post is hereby not admissible in a court of law. Anyway I doubt there was asbestos. There isn’t a speck of lead paint in the house, either, which makes no sense. They couldn’t even contaminate this house properly!
If I had to do this over again, I would have put in some plywood or something on that spot. But instead we had a “too soon old, too late schmart” situation, as my mother used to say. So I opted to use leveling compound to ease the transition between the linoleum and in the underfloor, and to patch up all the holes and pits and gaps as best I could. This was a horrible, horrible job. I couldn’t find my trowel, so I did it all with this rotten little putty knife. Leveling compound is smooshy, sticky, and gritty, and it dries way too fast. It’s awful stuff.
I used a LOT of it.


Don’t let anyone tell you you can’t use a pancake turner to smooth down leveling compound. You totally can! It doesn’t work. But you can do it.
Also, if you are a cat, you can wait until your person goes to Home Depot and then you can walk around in it.

Just walk around, go ahead.
When that was dry, the next thing was to roll out the flooring. This is the only part I asked Damien to help me with. Guys, it was so hard. It was so heavy and unmanageable, and I was so afraid I was going to tear it, and we had such an awful time wrestling it into place. Remember the thing about how the refrigerator was still in there. We planned to glue the flooring down one half at a time, and put the refrigerator on the half that wasn’t being glued, I mean the part that was being glued. Please don’t waste time trying to figure this out. It’s so stupid.
We also decided we could move the dishwasher, but didn’t want to. And that is how I ended up teaching myself how to cut vinyl flooring so it exactly fails to fall neatly into place around a dishwasher.

So, how you install vinyl flooring is you roll the adhesive onto the floor with a roller, then let it dry for half an hour or so, to allow it to emit any gasses it wishes to emit, and then you schlorp the flooring over it and push out any additional bubbles. Then you cry a little because you cut so carefully around those stupid little pipes, and somehow it came out all crooked anyway, but no matter! Remember, this is what we had before:

and this is what it looked like after the new floor was all glued down:

You can see that I leaped ahead a bit with this pic, because there is trim, too. We ended up staying up until 3 a.m. to get the flooring down. Then I slept rather late, and discovered that I had left the roller tray full of adhesive out on the kitchen floor, and someone had carefully dipped her little feet in it and then walked all over the house. I did not take pictures due to shattered spirit.
Then I went back to Home Depot for trim and misc. I ended up getting white vinyl composite quarter round, which I could cut with my dumb little hacksaw and nail in by hand.
I guess if I had to make my living crawling around on the floor tapping in finish nails, I’d get tired of it, but I had a great time doing this part. So satisfying to measure the space, cut it just right, and tap it into place. The idea is to make it flush with the floor, and not necessarily with the walls (and you can fill any gaps in with silicone later if you want); but you drive the nails into the walls, not the floor. Here I attempted a mitered corner.
At this point I was so tired, I was missing every other stroke with the hammer, as you can see, and I also managed to hit the wall a few times, chipping the brand new paint! But I tried!
There was also one spot along the end of the kitchen where there was still a flooring gap. So I cut a long strip of flooring and carefully followed the directions, which have you overlapping two pieces, cutting them both straight down at the same time so you get an even seam, discarding the extra, and then pulling up one end and easing some adhesive in there, then tucking the two ends down together, pressing it flat, and mopping away the excess.
You can see by my description that I fully understood the process. And yet I made a complete balls up out of it. I don’t even know what happened, but i was terrible. So I went back to Home Depot and bought some of that metal transition stuff you see between carpets and hardwood, and I covered that shit up. Tap tap tap!

Oh, and I treated myself to a new vent cover, even though the old one was perfectly good.

You can see that, at this point, I have managed to get most but not all of the glue out from between my toes.
Then I had to return to the villainous spot under the sink. It ended up looking pretty chimpy, but I feel good about how water resistant it is, especially (all together now!) compared to how it was before.
Behold! Before:

I shot some expanding foam filler into the really egregious gaps, let it dry, and trimmed it down. Then I covered the filler with rubber wall base, which is very easy to affix, especially after your husband shows you how to use the caulking gun.

Some of it turned out pretty tidy. Here’s with the expanding foam:

and the same spot (well, about a foot over) covered with wall base and caulked with silicone:

I wish I had painted this little section of wall, but oh well, I didn’t. I didn’t bother painting the legs holding up the counter, because the cat uses them as scratching posts.

And I made a little rubber mat with a lip out of leftover wall base, for a “water go this way, not that way” situation in front of the dishwasher, which needs a new seal and will get one soon.

Home Depot scoffed at me for thinking they might sell such a useful item, so I went home and made one, so ha ha.
And that’s it! The last thing I have to do is glue some threshold transitions on. I did dig out the old grungy wood with a screwdriver.

I looked through every last possible thing Home Depot was selling, and I dragged four Home Depot employees into my sad, sad story, but nobody could find a long wedge-shaped piece of wood that is an inch and a half high on one side. I finally found one dude who actually seemed willing to help me, and here is the conversation we had:
Me: Can you help me? I need a piece to make a transition between the floor and the threshold.
Home Depot employee: Here are some.
Me: Yes, kind of like those, but I need it to be an inch and a half high on the high end.
Home Depot: An inch an a half? That’s absurd!
Me: Yes. It is.
Home Depot: That would need to be a special order.
Me: Everything in our house is special order. And it’s not even a nice house.
Home Depot: Right, it doesn’t have to be nice to be special.
I feel, as they say, seen.
Anyway, I finally found something that was 3/4″ and clearly designed for some other purpose, but I had to leave or I was going to start crying. I know I said my goal was to end up with a floor that was better than my old floor, but my real goal was to not cry in Home Depot. So I cut two . . . well, I cut three, and one was an inch too short, but I cut two that were the right size, and I tried nailing them in, but they wouldn’t go in, and the wood split. Then I did cry. Then I yelled at everybody and made everyone feel terrible, and they all had to crawl over me while I was hunched in the doorway right at dinner time.
Ahem, then I got some Liquid Nails, and I shall glue the wood in tonight.
Yesterday and today, I finished sorting every last damn thing that was in that kitchen. I threw away about a third of it, including stuff I’ve owned for 20 years and haven’t used in 10, and washed everything down, and put it all back, with a little rearranging.
And now for the “after” pictures! Honest to goodness, if you say something mean or sarcastic, even for a joke, I will murder you. Here is my kitchen this afternoon:


I like it. I like it a lot.
What’s next? For one thing, this hutch is too big and dark.

So I’m going to paint it, maybe Glidden Spruce Shade, and put some white porcelain knobs and handles on it. That should brighten it up a lot. I would like to get rid of the wavy detail along the top, but that may be too much trouble. I’m excited about having the microwave in a spot where people can make their popcorn without moving a pile of junk out of the way, and about having the utensils in a spot where they won’t fall behind the island constantly. And look, I have a whole shelf for breakable items! So convenient for people who want to break my items!
And I would like to put in a tile backsplash behind the sink. I am eyeing some very faintly blue glass tiles. The sun sets right in the window opposite the sink, so that would be lovely.

Also, I had some shelves up here, on both sides of the blackboard, and no one knows where they went. I kept all my oils and meds and whatnot there, and I need them! It is a mystery.
And
I’m
going
to
fix
the
ceiling.
This is my ceiling this afternoon:


Note the poster board. That’s covering up the really big hole.
First it needs some new insulation, which is easy. Then I thought one last time about restoring that stamped tin. I thought about just how much I wanted to stand on a ladder and smear caustic solvent above my face onto 165 square feet of intricate raised designs; and the only answer was “NOT AT ALL.” So I’m gonna get some plain white panels and just tack them up on those beams. You are thinking, “Oh, but stamped tin is my favorite! Oh, what a shame!” And that’s why I’m carefully preserving it for someone just like you, and when I’m dead, you can come in and do whatever you want.
Okay, now we can get a puppy.

Thanks for your short article. I would also love to say that the health insurance brokerage also utilizes the benefit of the coordinators of a group insurance. The health insurance agent is given a summary of benefits sought by someone or a group coordinator. What a broker will is look for individuals as well as coordinators which often best complement those demands. Then he presents his advice and if each party agree, this broker formulates binding agreement between the 2 parties.
How beautiful and light and airy-feeling in the final pictures! I’m in awe of your skills, and WAY more in awe of your cooking posts having seen the room where it happens!
That was so much fun to read. Home Reno is no joke and you made it SO much better. Enjoy the your cooking space!!! I love how you described the process.
Wow! What a turnaround! Clean fresh painted walls are such a rest for the eye! And not having flooring that causes crap to hide in little pockets is very nice :). I lived in a rental for a while and the kitchen had that same linoleum pattern. Turns out it matched the mud in our yard and hid foot prints very nicely. Also kept the spilled juice from spreading everywhere- it would bead up instead. I liked that floor :).
Anyway, wondering if you thought of putting curtains down below your counters? I’ve seen that done before in my friend’s college apartment- they had horrible cabinets, took the doors off and then staple gunned cheap check fabric from JoAnn’s up and called it good. You could use old sheets and hang them from those little brass hooks that screw in. I don’t know? Something for your more adventurous teenage kids to try? If you use the hooks, you can wash the fabric when it gets too splotchy. My friend did it maybe once a month?
I actually have this to cover the island after the doors fell off. I got some water-resistant fabric at Walmart and it’s held up very well. I forgot to put it back up for the photos. Plan to make more for in front of the counter.
It looks fantastic! Well done. Also, this is my favorite thing I’ve read during this whole COVID-induced crazytime. Maybe ever.
Simcha it looks so good! We’re in the middle of our own hellscape renovation and this gives me so much hope. Thank you :’)
Honestly, I’m in awe you did that all yourself. It looks fabulous!
It looks so good! I am about to tackle a a much smaller job re-doing one of our bedrooms, and I’ve already been having a pity-party about how much work it’s going to be before I’ve even started. Thanks for the reminder that it’ll be worth it.
Yay! That’s an incredible improvement! So much easier to clean. What do the kids think?!!!
This was so darn fun to read! Yes! Put blue tiles in with that lovely yellow.
Oops my email addy was wrong.
Freaking awesome. So cosy. I’d want to hang out there. Definitely get the fun tiles for back splash. The natural light in your kitchen would serve them proud.
Wow.
Congratulations.
BTW the hutch is lovely in shape – a new brighter color will certainly add to its charm.
I admire the effects! And I know what I am saying, being the one who renovated our panelling-covered walls with my own hands :).
Looks great! P.S instead of plain you can get stamped ceiling tiles at Home Depot. The look you want without having to strip your ceiling!
I love the bright yellow and how ingenious you were doing all these improvements! It inspires me to improve and enjoy my own kitchen. I want to put glass tiles in also.
Holy carp that’s a transformation.
Hope you get -some- sleep now that you’ve birthed that baby.
Congratulations on your new floor and yellow walls! I love a yellow kitchen. Your hutch will look really nice that color. We live in a project house too.🙂 It always feels so nice to get something done!
Awesome job with the floor! Re: the hutch, if you’re going for an old-timey, country kitchen feel, I think you should keep the wavy bit. (Also, removing it would probably be a hassle, and I’m all about avoiding hassle when possible.)
You worked so hard!! I was feeling nervous for your kitchen halfway through this post, but it sure does look great at the end!
This is AWESOME–I always love your pieces on home improvement and family life! We’re trying to deal with a bathroom right now, so you had me laughing with you a lot!
The floor is certainly an improvement!
You did an amazing job!! I am very much impressed. I’m also intrigued by your open counters. What a unique idea! My list of projects around my old house far exceeds my energy level and time limitations, but I keep plugging away at it. You are my inspiration today.
As a Canadian what do you think I noticed? Canada Dry on your counter!
What a lot of work! Enjoy the fruits of your labour.
It really does look great. Good job.
That’s a billion times better. Huzzah! I love a new floor. It’s like wearing new shoes—you look down all the time and feel happy!
Great color choice! I love a lemony, sunny yellow!
I love how fresh paint and new flooring makes me feel. I love the yellow and the lino.
You are hilarious and a delight. Really nice job with all of this! It’s so much work to take on a repair project, and I think it looks beautiful. The yellow walls are a great touch.
This is amazing! That is just SO MUCH WORK for one week (sorry to yell at you, I’m just incredibly impressed). I love that yellow and your plans for the blue glass tile and painting the hutch.