

Halloween is almost here. How are the costumes coming?
I’m sorry. I didn’t mean to bring it up. Please stop crying. Did you want me to call someone? You sure?
All right, I’ve been making costumes for kids for over twenty years. I don’t really know how to sew, and I don’t want to spend a ton of money, and my kids often pick costumes that no one sells. So DIY it is.
Here are a few ways to make them . . . not easy, exactly, but much less hard. The most useful things I’ve learned:
MAIN BODY:
Giant adult t-shirts can be turned into all kinds of things, and they are already hemmed. Always always always use existing hems whenever you can! Tuck the sleeves in (sew or glue them if you like), and a little kid can wear a T-shirt as a skirt, using the neck as a waist. This is how I found a brown skirt for Avatar Kyoshi: brown t-shirt, $1, done.
You can also turn a T-shirt into a cape, using the already-existing neckline. Just cut off the back and sleeves of the shirt and “hem” the rest with hot glue or duct tape. This is not razzle dazzle, but will please a young kid.
Here are Zita the Spacegirl and Robot Zita, made with Daddy’s undershirts and some black plastic garbage bags:

Black duct tape would have been miles better, but this was an emergency “Mama, I forgot to tell you we’re supposed to dress up tomorrow for Whatever Day” costume.
Even cheaper: If you can’t find a plain shirt in the right color, get a shirt with a logo and turn it inside out and just cut off the tag if it shows. Here’s Wish Bear wearing an inside-out sweatshirt that had a different pattern on the other side, because we couldn’t find a plain light aqua sweatshirt.

I glued on a felt belly and decorated it with puffy paint. I can’t explain what was going on with those ears, though. This is a classic example of overthinking and over-engineering. I should have just cut two little ear shapes out of felt and clipped them to her head using tiny hair clips, or attached pipe cleaners to a headband and covered them with card stock or fabric. Easy peasy. As it is, she resembles Head Trauma Bear (which, come to think of it, would explain a lot about Care Bears in general.
Sometimes a good old paper bag gives you the look you want. Not recommended for masks if you’re planning to be walking long distances in the dark. This Strong Strong costume was for “favorite character” day:

Paper bags can also be converted into vests pretty easily — just cut a front opening and a neck and arm holes, and decorate however you like. You can bash in the corners to make it look more like clothing. You can also just cut a head hole and cut the sides off completely and make a boxy poncho, making the base for all kinds of square costumes (robot, Lego piece, iPhone, etc.).
Bathrobes bathrobes bathrobes. These are always abundant at the thrift stores around here. Manga costumes were a big deal one year, and I discovered you can take some quick hand stitches to make them fit the kid, then add trim (I glued on fur for one, and used metallic duct tape for another), then complete the look with a sash and sweatpants.

If you need a basic flowy dress or robe, turn the bathrobe backwards and do whatever you want to the neckline — trim it and hem it with duct tape, disguise it with a scarf, or hide it with a collar made of cardboard and tin foil. Using an already-existing article of clothing is always light years ahead of starting from scratch, and you can often find robes in fancy, silky fabrics.
Backwards button-down adult shirts also make good tunics or basic dresses. You can add high or low belts to vary the look quite a bit. Check out this nice little prince in my shirt and my husband’s belt:

You can also use duct tape to cinch sleeves in wherever you like, which changes the look quite a bit.
If you need puffy upper sleeves and tight lower sleeves, cut the end out of long socks and put them on the kid’s lower arms. Over that, put on an adult long-sleeved shirt, scooch the sleeve up to the elbow and cinch them in place with duct tape.

If they’re the same color, it will look like it’s one top with fancy sleeves. Remember: nobody needs to know what it looks like underneath!
A giant cloak hides a multitude of errors. One of the few sewing projects I can manage is this basic hooded cloak. I’ve made six or seven of these over the years, but I find that you need to make the hood about 50% larger than what the pattern calls for. It’s a pretty forgiving pattern overall. Here is my daughter wearing a store-bought dress and the hooded cloak she made herself, with almost no sewing experience:

One year, a kid wanted to be Ash from Army of Darkness, and we just used a big wool blanket draped strategically and held in place with a giant safety pin. We made a tinfoil dummy clasp to cover the pin.
Guess what? You can spray paint some clothing. Search for items that are the right shape and style at the thrift store, and paint them the right color. It’s easier then dyeing, and paint will stick to, for instance, shoes and vinyl. It will crack eventually, but it’s good for a night.

I’m a fan of bath towel ponchos for costumes of things (rather than people). They are warm, easy to get around in, and the kid can wear something neutral underneath. Find a bath towel in the right color, cut a horizontal slit halfway up for the head, “hem” it with duct tape, and decorate it however you want. Keep it rectangular and it can be a slightly floppy Creeper:

You can paint towels, I should say, but it takes forever because they are, duh, absorbent. I still think this is a good costume, but it was pretty time-consuming, if not difficult. It may have been easier to hot glue felt squares to the towel, rather than painting.
Fleece is also handy for these over-the-head, free-form costumes. You can cut it into all kinds of shapes and you don’t need to hem it at all. You can be, for instance, a piece of pizza (but you may need to reinforce the shape with strips of corrugated cardboard). Fleece is a little pricey, so I don’t often buy it from the fabric store.
If you can do a tiny bit of sewing, here are some tips from Elisa Low, who does stuff like this every day for the costumes she makes. Elisa says:
With a seam ripper and some minor sewing skills it is easy to remove the top part of a collar on a men’s shirt (the part that folds over) so you are left with only the round part that stands up, like they had in the Old West.
Boy’s colonial knickers are easy to make from men’s or women’s pants. Just cut off the bottom part, cuff them, and attach a decorative button on the outer side of each cuff.
As far as fabric, remember that clothes are made of fabric! So instead of going to the fabric store, go to the thrift store and look at the XXL clothes. Large dresses, skirts, coats… these have lots of fabric for low prices and you can make things out of them. Also look in the curtains and bedding sections for good fabrics.
For pics of some of Elisa’s projects, check out her blog.
HEADPIECES, HELMETS, CROWNS, and ACCESSORIES:
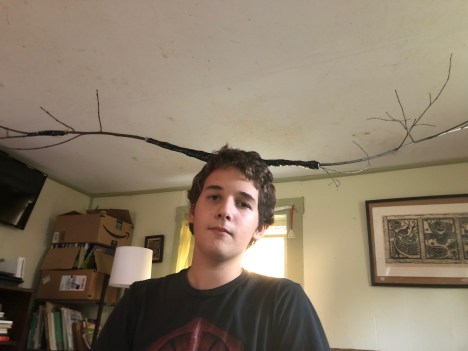
Horns, ears, antlers, etc. need to be as light and well-anchored as possible. Whenever possible, start with a store-bought novelty headband and build off of that, rather than trying to attach something to a plain headband. I bought some cheap bunny ears, bent them down, cut a hole in the top, ran the sticks inside, and taped over the whole thing with duct tape, and once we find some black spray paint and put it together with a black face mask and hood, we’ll have some light, sturdy tree branch horns for the Beast from Over the Garden Wall.
You can also take a headband, build on whatever shape you need out of pipe cleaners, and cover it with fabric or card stock or felt, or simply find some stiff fabric, fold it in half, cut out a double ear shape with the bottom still attached, wrap it around the headband, and glue it together, as we did for Squirrel Girl here:

Pillowcases are awfully handy if you are making a medieval headpiece, a veil for a nun, a pharaoh costume, etc. They can also be folded lengthwise and used as sashes, if the kid is skinny enough; and they are fine as basic capes with a few safety pins.
Plastic milk jugs make great Greek or Roman or Medieval helmets for people with small heads. Find a picture of the helmet style you want, trace out the lines with a magic marker, and just snip away, using the jug handle side as the nosepiece. You can spray paint them any color you like. Here’s a Spartan helmet on Pinterest; here’s a knight’s helmet with visor. You could even make a Mickey Mouse headpiece this way by adding ears and spray painting the whole thing black.
Milk jugs turned the other way around (with the flat part in front, not the handle part) are also handy for the base of whole-head helmets (like for a Storm Trooper or a gas mask), as long as they’re for small heads. Pretty much anything that needs to fit over a small head can start with a milk jug.
If the kid’s face will be covered, let him wear the helmet plenty beforehand, so you can be sure it’s breathable enough and he can see well. Also, if you’re using glue or spray paint, let it air out for several days before the kid wears it! You don’t need him passing out from fumes.
You can also use milk jugs for bishops’ mitres. (The mitre is the hat. You’re thinking of “crosier” — that’s the staff thing he holds.) Just find a clear picture and trim away. Add paint, ribbon, etc. to make it look authentic.
Milk jugs can also, sigh, be used to make an elaborate papier mache chain saw hand. Here are directions, if you insist.
If the paint does not adhere they way you like, or if you want more texture, rough it up with sandpaper before painting.
A round bottle, like for a large bottle of juice, can be cut into a crown or circlet, if the kid’s head is small enough Spray paint it gold and add some gems or whatever you like.

Those blank white masks from Walmart can be adapted in any number of ways. To make this Ichigo Kurusaki Hollow Mask,

I added paper plates to the top to make the skull round, and covered the existing eyes, nose, and mouth holes with paper plates and tape, and then re-cut the eyes in a different shape. Then I spray painted everything white and added the details with red and black Sharpies. Adapting something that’s already designed to be worn is almost always easier than starting from scratch.
Here’s a last-minute costume that began with a plain white mask, plus various items raided from past Halloweens:

I dunno what it is, but it got attention.
For some excellent, customizable masks, you can pay a small sum to download templates for 3D masks from Wintercroft. Friends tell me they are time-consuming to put together, but they turn out just as described. Really neat designs.
Disposable pizza pans from the dollar store make good shields that don’t get too heavy, and they’re already metallic, yay. You can also decorate them with hot glue and then spray paint it, for a worked metal look. Use duct tape to make straps behind. You can also color directly on foil with Sharpies.
Use the bottoms of small juice or soda bottles for excellent medallions or for crowns, dress trim, etc. Just cut the bumpy bottom off, maybe smooth the edges with sandpaper, and spray paint it gold. Lots of things look amazing when you spray paint them gold or silver. Here’s a handsome little vampire with a soda bottle Count Dracula medallion (I made a slit for the ribbon before painting, and glued on a plastic gem after):

Foam meat trays work well for stiff but light accessories. You want the kid to look good, but also to be able to get around; so keep weight in mind. Foam meat trays (washed thoroughly, of course) are great because you can cut them into all kinds of detailed shapes, spray paint them, glue things to them, and so on, but they won’t drag the kid down. BUT, some adhesives will dissolve foam! So test it first.
Pipe cleaners make decent last-minute glasses, if not especially comfy ones:

General rule for accessories: Keep it light. I’ve made this mistake more times than I can count: I forget how heavy everything is going to be, and the kid is overwhelmed. In this Rainbow Dash costume, I made everything way too big, and it was unwearable:

The following tools are your greatest friends to put on details that can really make the costume:
Colored duct tape, either to make easy hems or to add details, or both.
Puffy paint.
Felt.
Foam craft sheets. These come with our without an adhesive side.
Sharpies. Sharpies can color on any number of surfaces, including foil and plastic. Elisa Low reminds us that you can color plastic gems, too. Brand name markers are much more brilliant and adhere better than cheapo ones from the dollar store. (Beware the treacherous “Sharple,” for instance.)
And of course hot glue.
Speaking of glue: I always root for glue before sewing, but I’ve ruined more than one accessory by using the wrong kind of glue. Check the label to see what materials it will work on, and test it if you can! Some adhesives will dissolve certain materials; others simply won’t stick. Some take days and days to dry completely. There are soooo many kinds of glue available in the craft aisle, so take the time to make sure you’re getting the right one.
And don’t forget glue dots. These are moldable, and are sometimes the only thing that will work.
And sometimes you don’t need glue at all. For Hellboy here (who made his own right hand of doom),

I ended up making small holes in a bald cap and poking spray paint can tops through for the sawed-off horns. The tension held them in place. (I covered the can tops with crinkled duct tape to give them more texture before spray painting them.)
It’s okay if it looks ugly halfway through. I get overly fixated on making things look pretty at every step, but you can always attach things with as much duct tape as you need and then spray paint over the whole thing. Spray paint does not adhere very well to packing tape, though.
MAKEUP:
Keep makeup basic unless you have experience with it. Trying to cover someone’s entire face another color is harder than it sounds, and you often end up with a patchy, diseased effect. Here is a successful attempt at full-face makeup (well, half face) which I’m including just because I’m thrilled without how it turned out. But it took FOREVER. Forever forever forever. So don’t think, “I’ll just smear on some make up right before we go out.”

Instead, pick the main features and just stick with those. Here’s a less-successful attempt at makeup. The child specifically wanted just the lower half of her face to look like a furry cat, and I tried to comply:

She was actually happy with it, which is what matters; but every time I looked at her, I thought, “Burl Ives!”
Beards on babies: I can’t decide if this is brilliant or stupid, but I also used Nutella to make a Paul Bunyan beard for the baby. I didn’t want to put makeup on the baby’s tender skin, but Nutella felt nice and safe. She did eat most of it before anyone saw her, though.

GENERAL INSPIRATION:
If you’re just starting to figure out how to make the costume, Google “character X costume” rather than “character X.” Even better, Google “character X cosplay,” because those will show you homemade costumes, not store-bought. Other people will have solved a lot of problems for you already, and other people will have picked out which features are really necessary to make the costume look right. I tend to get bogged down in details, but you can get lots of details right and still completely miss the overall look you’re going for.
Any time you can persuade a kid to be a person rather than a licensed character, you’re going to get off easy. Here’s a costume my daughter put together in about three minutes:

The only down side is that everyone now knows we’re horrible parents who let our kids watch Die Hard.
You don’t have to be literal. Do mashups of two characters, or make a nod toward the character, rather than tracking down every last detail. A serviceable, if slightly off-fleek Terminator here:

We forgot to spray paint the gun, but the Austrian accent and the attitude put it across.
Other variations: I had my heart set on dressing the baby as Paul Bunyan (above) for some reason, but I couldn’t find a plaid flannel shirt in her size; but I did find a red and black checked poncho, and did not hear any complaints:
The same goes for lots of other costumes: a ballerina pony might be even cuter (and easier!) than a regular pony; and you can make a meticulously accurate costume from the neck up, and then just wear a plain sweatsuit or a dressy suit, and it will still hit home.
Attitude goes a long way to making a costume work. This Raven costume was really just an approximation, but the way my daughter spoke and carried herself was dead on:

THE FINAL WORD ON APPROACHING HOMEMADE COSTUMES:
There are really two major mistakes you can make with costume-making:
One is making a costume that looks great, but the kid can’t move in it. I once made a “rider-riding-a-horse” costume, with false legs and all. It was adorable and amazing, but completely non-functional. Two steps and the kid was in tears. So make sure it’s walkable; make sure the kid can see; make sure it’s an outfit, not a prison!
If the kid is old enough, he can consent to wearing a costume that is extremely uncomfortable. I wish I had a better picture, but we did the old “severed head on a platter on a formally-set table” costume one year

and it was fabulous. Exhausting to drag around and keep stable, but fabulous. He went around saying “Alms for the bodiless?” instead of “trick or treat” and he got a lot of candy. (Oh, look! Behind him, there’s Ash with his milk jug chain saw hand.)
The other terrible mistake you can make is trying to make the costume look the way you want it, rather than how the kid wants it. Do it their way, whenever possible.
I had wonderful plans for Nightmare Moon. The four-year-old, however, had plans which were wonderful to her, including make up design. So those were the ones we went with. She got lots of candy, too.

Same with Rey, here. I had some wonderful ideas for how to make it look more authentic, but she had her ideas, and it was her costume. She was a very happy girl.

And then sometimes the kid says she wants to be a Pink Mummy Ghost. What is this? We don’t know. We only hope that, by some miracle, the thing we come up with is the same as whatever it is that’s in her crazy head.

And my final bit of advice? Don’t feel like your honor as a DIYer is on the line. If there’s a shortcut to be had and you can spend the money, go ahead and spend the money. I realized that I could buy furry fabric and sew squirrel girl, above, a wonderful tail, or I could buy some readymade furry leg warmers (intended for what costume, I do not know), attach them together with safety pins, stuff them, and it was, what do you know, a wonderful tail.
And guess what? Here is a “Vampire Queen.” How much of this costume did I make by hand? NONE. A little face paint. She was delighted.

So if you need permission to give yourself a break, I hereby grant you permission.

Especially if you are making a costume for a toddler. The more time and effort you put into making a costume for a toddler, the less likely it is the little crumb will wear it. Here is a child who said repeatedly all through October that she wanted to be Wonder Woman, or possibly Dashi:

And that’s how that goes. Happy costuming! Please share your tips and hacks in the comments. And seriously, if you’ve ever come up with a good way of making a cat tail that curls up but doesn’t make people feel uncomfortable when they wear it or see it, let me know asap.

Porn
Hey very nice blog!! Man .. Beautiful .. Amazing .. I will bookmark your site and take the feeds also厈I am happy to find a lot of useful information here in the post, we need develop more strategies in this regard, thanks for sharing. . . . . .
Sex
Re: cat tail, I found a black “giant chenille stem” at Hobby Lobby and it’s going to work perfectly for a tail. Easy to cut to the right size for the kid who’s going to wear it and you can shape it however you want.
Sorry I’m commenting so much, but I remembered another one…
My younger brother once used white face paint (or was it baby powder?) And added big black circles around his eyes. He dressed in a thrift store suit with a white flower in the button hole. When people would ask what he was, he’d just grin sheepishly and say “I’m not really sure.” I think he finally settled on ‘Armani corpse’.
Sorry about the computer problems. I hope you are back soon, because you’ll know the right things to say to honor Richard Wilbur.
So… could you do a post where we can share Halloween costumes? Kinda curious to see what others are up to and to share what we’re doing.
I assembled two really nice Doctor Who costumes for my teenage daughter entirely from Salvation Army. Got a 3 piece suit for $10 on a sale day. And a really nice London Fog trench coat for a similar price. And because they’re good quality she’ll probably be able to wear them for as long as she’s a Doctor Who fan. I’ve also gotten a lot of second hand store bough Halloween costume piece really cheap there during the Halloween season.
I painted an old t-shirt with acrilic paint this year for a costume. Worked out well, just make sure you put some cardboard in the shirt when you paint it so it doesn’t bleed through. (I’m going as the Death Star because I’m hugely pregnant and currently resemble it. I painted a black maternity shirt)
For a toddler, you can make a shirt shorter (to avoid tripping) by gathering it up at the shoulders in the back with a safety pin. Cardigans from the thrift store can be easily made into open front toddler robes. Shorten the sleeves, and it’s possible to gather the extra fabric in the back and tack it in a couple places so it looks like a hood (non functional, but gives the impression).
Pipe cleaners make good frames for ears. Just attach your frames to a headband and sew or hot glue fabric or paper on the frames, and you have lightweight ears that aren’t too delicate and will actually stand up (or out) instead of flop.
(Toddler is going as Yoda. I’m not brave enough to try face paint though, at least not full face).
Graduation gowns can be found at thrift stores pretty cheaply and are a good base for a lot of different costumes. (Hubby is going as Darth Sideous. We already have a black hooded cloak).
Thanks to those who recently gave me costume advice here! Have got the Toothless the Night Fury costume together for 7-year-old (using purple-and-black bat costume minus head, bought a Toothless hat from some talented person on Etsy) except for the tail. We have a black cat costume with a tail that clips on that could probably be adapted with construction paper, but it is a pain to find when it falls off. You know, being black. At Halloween. When you’re walking around outside at night. Actually it’s a miracle we still have the thing. Here’s hoping child forgets about the tail.
That Katara costume is AMAZING.
ThatKata
Definitely test makeup beforehand! My sister once wanted to go as Night (as in “O Night! which ever art, when Day is not”), and I had this brilliant idea to paint her face black with a big silver crescent moon on one side. Well, it looked like blackface. I don’t remember what we ended up doing, but it wasn’t that, and it made us late.
Love Strong Strong. My twins, prenatally, were Strong Bad and Coach Z in a fish eye lens, thanks to my husband’s talent with face paint on my belly.
I had one (who was 4 at the time, iirc) who wanted to be a “dragon sword.” I don’t know what that is either, but he seemed fine dressed in green with a wrapping-paper-tube tail. I used the triangular cut-outs from the tail to tape to his shirt, per his directions, as the “sword” part. He was happy. Same kid the previous year wore a Tigger costume we had and told everyone he was a knight.
I want the cat tail ideas too! I keep thinking what an easy costume it will be, but forgetting about the tail.