Happy Friday! I don’t remember why, but I even though I was quite busy this week, I planned a menu with some heavy and elaborate meals. A foolish but delicious error, and we have arrived at Friday, safe and sound and full of butter.
Here’s what we had:
SATURDAY
Kids leftovers; adults pizza
Damien and I have been ships passing in the night lately, so we ditched the kids and spent some time being ships having pizza together. Sausage and mushroom, very good.
SUNDAY
Hot dogs, fries
Sunday I got a ton of yard work done. I lugged a dozen cinderblocks out from the back (in fact they were from Damien’s Amazing Interchangeable Cinderblock Meat Altar Situation, which he no longer uses because he now has a real smoker and grill) and made a little retaining heap (can’t really call it a wall) for the flower bed in front of the house, which I’m going to fill in with soil and ferns.
Then Damien and I moved the enormous granite post to make a front step. It’s . . . still a work in progress.
Then I looked at the house and realized if I was gonna plant more in front of it, I need to fix the siding first. The spot where the porch used to be attached looked like this:

Easy peasy, don’t have to get on a ladder or anything, and I had saved a bunch of siding from the porch, so I had matching siding and everything. EASY PEASY, I tell you. An idiot could do this!
Well, and idiot could do something. This is what I did:

This is the kind of job where I say reassuring things out loud to myself in the hearing of my kids, because the mother’s verbalized self-talk becomes their own internal voice as they mature, or something. Anyway, I said loudly several times that I’m good at other things, and it doesn’t really matter that much, because I’m going to find some really tall ferns.
Then I planted a few more perennials I had gotten on clearance and lost the tags for, so I have no idea what they are, but I wish them well. Then Corrie and I spent some very pleasant time sorting flower seeds I’ve been collecting all summer, and then we split open the pits from our modest peach harvest.

I was very happy that we managed to get intact kernels from some of the really monstrously big peaches. Our technique was to put the pit on its edge on a rock, insert a flat-head screwdriver in the seam, and tap the screwdriver until it split, and then pry it open the rest of the way with the screwdriver.
Obviously peaches can grow from a pit that hasn’t been opened, but taking the kernel out and just planting that increases the chances it will sprout. This weekend, I’ll plant them in pots in the ground covered with used duck straw, and in the spring, we should have a few seedlings.
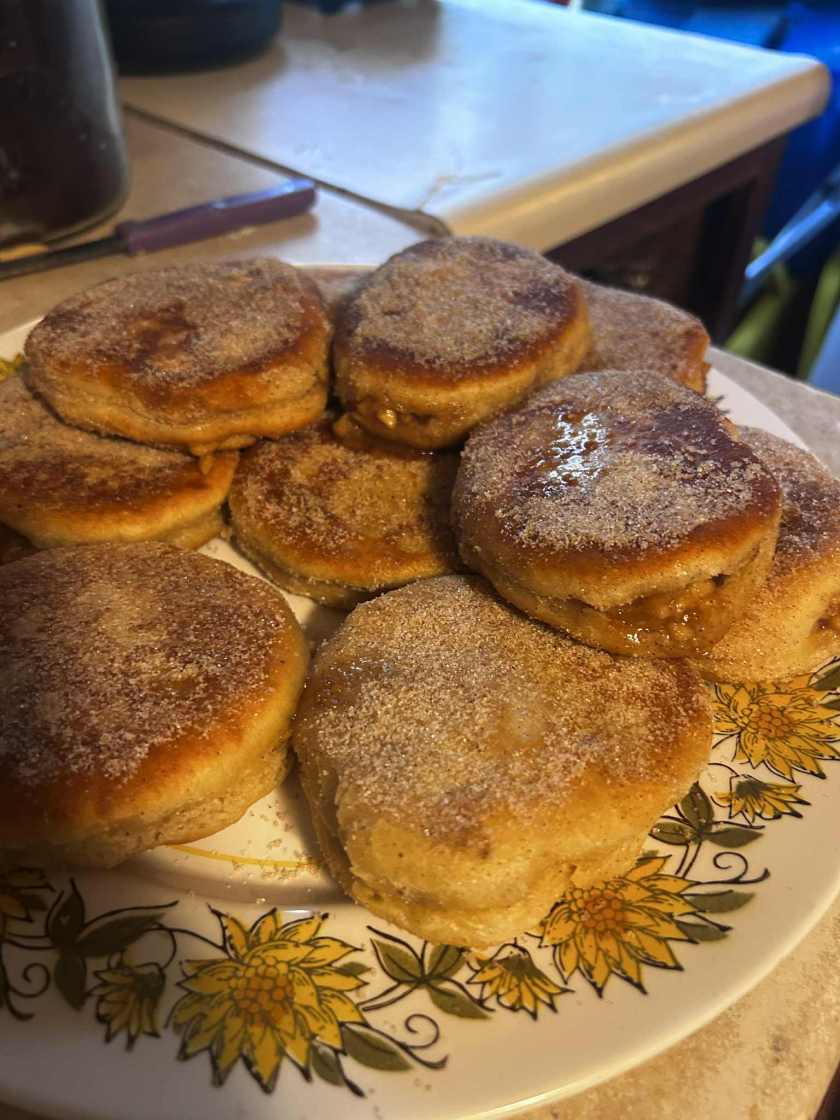
Sophia had the day off (she’s commuting to college and working), so she made some yeasted cider donuts stuffed with apple filling. Superb.
The plan for supper was Chicago-style hot dogs, with all the chopped vegetables and celery salt and whatnot, but it just didn’t seem worth it, especially since most of the family was out helping Moe move to his new apartment. And especially since granite posts are really heavy, you guys. At one point I heaved so hard that that first my back popped and then my ears popped, and the the word “hernia” popped into my head, so I stopped heaving. So we just had regular hot dogs and fries.
I did make some ice cream: Two batches of strawberry and one of chocolate, using recipes from the Ben and Jerry’s Ice Cream cookbook, which I highly recommend if you’re thinking of getting into homemade ice cream, which I highly recommend.
It was just supposed to be regular chocolate, but something went funny with the texture, and everyone assumed it was some kind of fancy chocolate chip
and I didn’t say a peep.
MONDAY
Bacon chicken ranch wraps, chips
Monday was full of exhausting appointments, so I was happy to have an easy and popular dinner plan. I cooked some frozen chicken tenders and a few pounds of bacon, and served that on tortillas with chunkily shredded cheddar cheese, sliced tomatoes, and dressing.
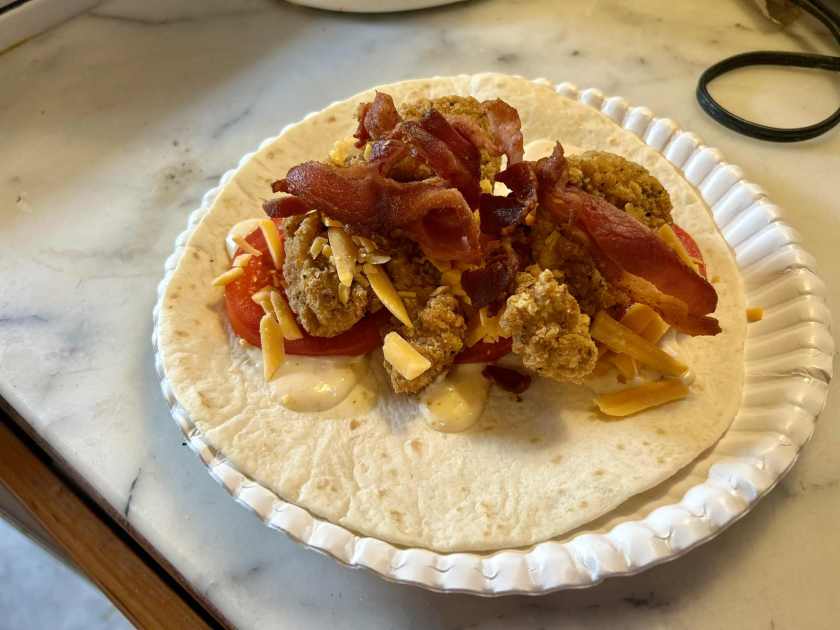
I had some kind of spicy honey mustard, but I think others chose ranch. It was pronounced “yum dot com.”
TUESDAY
Oven-fried chicken, mashed potatoes, sorta-glazed carrots
Tuesday, you’ll never guess, we had another appointment. I was able to prep everything in the morning, though, so there wasn’t much left to do by suppertime. I started the chicken soaking in seasoned egg and milk for the oven-fried chicken
Jump to Recipeand made some regular mashed potatoes, and put them in the slow cooker to stay warm. Then before supper, while the chicken was finishing up cooking, I made three pounds of glazed carrots in the oven using this recipe from Recipe Tin Eats.

The chicken honestly looks kind of gross here, but in real life it was scrumptious, with real crackly skin and super-moist meat, full of flavor. I love this recipe.
I made the carrots using bacon grease, and it did impart a very mild savory flavor, nothing to knock your socks off. These carrots are very popular with a couple people and everyone else thinks they’re okay.
WEDNESDAY
Garlic butter chicken bites, risotto, steamed broccoli
Wednesday I tried a new-to-me recipe from Sip and Feast, which combined four of my favorite words: Butter Garlic Chicken [and] Bites.
It was a little time consuming, but that’s mainly because I made a triple recipe. It’s really pretty simple. You cut the chicken (boneless, either breasts or thighs) into chunks, season them, and dredge them in flour, and sear them in oil, and set that aside. Then you melt a ton of butter and cook a lot of garlic and red pepper flakes, then add a bunch of white wine and let the sauce reduce. Then you put the chicken back into the pan and heat it up.

I wish I had seared the chicken a little darker, but wow, it was delicious. I mean how could it not be, with those ingredients.
Earlier in the day, I made a pot of Instant Pot risotto.
Jump to RecipeI use more butter and cheese than the recipe calls for, but it’s good as is. Then right before some supper, I steamed some frozen broccoli. And it was a lovely meal.

I didn’t count the calories because I’m a Lit major and I can’t count that high.
THURSDAY
Bibimbap of sorts
Thursday I was very proud of myself for how fast I prepped supper. As soon as I got home from school drop-off, I chopped some vegetables, shredded and pickled some carrots, defrosted and sliced some meat, and set up the Instant Pot with rice, and set out sauces and sesame seeds, sprouts, spinach, and crunchy noodles, all in about eighteen minutes flat.
I spent the rest of the day editing, and there was a huge amount of driving around doing this and that in the afternoon, but when I got home, all I had to do was press the “rice” button and throw the meat in a pan. When it was mostly cooked, I doused it with a lot of soy sauce and finished cooking it. Is this subtle or authentic or layered in flavor? No. But it was a damn fine meal all together, with lots of wonderful flavors and textures.

Here’s the recipe for the pickled carrots:
Jump to RecipeI honestly can’t remember the last time I enjoyed a meal this much. It’s probably because I got a lot of other things done that day, and I was especially relieved about having finished one project that’s been hanging over my head for months, and that added to my satisfaction; but also it’s just a damn fine meal. I like to put a layer of raw baby spinach on top of the rice but under the meat and fried egg, so the spinach wilts. Yum yum.
It looked like there might be a frost that night, so I covered my basil, eggplant, and cucumbers, and picked the rest of the corn. I wasn’t expecting much (I had already done the main harvest, and these were the secondary ears of corn lower down on the stalk, and the corn from the second harvest that I shoved in the ground on a whim and didn’t bother to de-tassel), and it was indeed not much.

For my own amusement, I lined them up in order of best to worst:

and then the other way around:

and that’s-a my corn! I read about corn development and I temporarily knew what had caused the various problems you see on the bad end of the corn spectrum, but I have since forgotten. Maybe I should call in a prisoner that I’ve heard has some skill interpreting these things. (This is a Bible joke, but I’m too sleepy to finish writing it, sorry.)
Anyway, I think I’ll give this corn to the ducks, who have no skills of any kind, but they sure do like corn.
In the evening, I drove out to pick up a chainsaw someone was giving away! I’m super excited. It’s my first chainsaw. I can tell the rest of the family is excited, too, because I heard one teenager say to the other, “Ho ho ho, now she has a chainsaw.”
FRIDAY
Regular old spaghetti
ANOTHER appointment this morning, and that’s it for the week, whew. Because it’s Friday, but still. Whew. Damien and I were supposed to go remote camping for two days this weekend, but I think it’s our destiny to stay home and hang out, much to the dismay of the children, who were looking forward to . . .I don’t know what . . . when we go camping. Poor things, it’s hard for them, because we’re so incredibly lax and undemanding when we’re home, it must be difficult coming up with some way to let it all hang out even further when we leave. I think they just watch MORE tv and eat ADDITIONAL candy.

Oven-fried chicken
so much easier than pan frying, and you still get that crisp skin and juicy meat
Ingredients
- chicken parts (wings, drumsticks, thighs)
- milk (enough to cover the chicken at least halfway up)
- eggs (two eggs per cup of milk)
- flour
- your choice of seasonings (I usually use salt, pepper, garlic powder, cumin, paprika, and chili powder)
- oil and butter for cooking
Instructions
-
At least three hours before you start to cook, make an egg and milk mixture and salt it heavily, using two eggs per cup of milk, so there's enough to soak the chicken at least halfway up. Beat the eggs, add the milk, stir in salt, and let the chicken soak in this. This helps to make the chicken moist and tender.
-
About 40 minutes before dinner, turn the oven to 425, and put a pan with sides into the oven. I use a 15"x21" sheet pan and I put about a cup of oil and one or two sticks of butter. Let the pan and the butter and oil heat up.
-
While it is heating up, put a lot of flour in a bowl and add all your seasonings. Use more than you think is reasonable! Take the chicken parts out of the milk mixture and roll them around in the flour until they are coated on all sides.
-
Lay the floured chicken in the hot pan, skin side down. Let it cook for 25 minutes.
-
Flip the chicken over and cook for another 20 minutes.
-
Check for doneness and serve immediately. It's also great cold.

Instant Pot Risotto
Almost as good as stovetop risotto, and ten billion times easier. Makes about eight cups.
Ingredients
- 1 medium onion, diced
- 4 cloves garlic, minced or crushed
- 1 tsp salt
- 1 tsp ground sage
- 3 Tbsp olive oil
- 4 cups rice, raw
- 6 cups chicken stock
- 2 cups dry white wine
- 1/2 cup butter
- pepper
- 1.5 cups grated parmesan cheese
Instructions
-
Turn IP on sautee, add oil, and sautee the onion, garlic, salt, and sage until onions are soft.
-
Add rice and butter and cook for five minutes or more, stirring constantly, until rice is mostly opaque and butter is melted.
-
Press "cancel," add the broth and wine, and stir.
-
Close the top, close valve, set to high pressure for 9 minutes.
-
Release the pressure and carefully stir in the parmesan cheese and pepper. Add salt if necessary.

quick-pickled carrots and/or cucumbers for banh mi, bibimbap, ramen, tacos, etc.
An easy way to add tons of bright flavor and crunch to a meal. We pickle carrots and cucumbers most often, but you can also use radishes, red onions, daikon, or any firm vegetable.
Ingredients
- 6-7 medium carrots, peeled
- 1 lb mini cucumbers (or 1 lg cucumber)
For the brine (make double if pickling both carrots and cukes)
- 1 cup water
- 1/2 cup rice vinegar (other vinegars will also work; you'll just get a slightly different flavor)
- 1/2 cup sugar
- 1 Tbsp kosher salt
Instructions
-
Mix brine ingredients together until salt and sugar are dissolved.
-
Slice or julienne the vegetables. The thinner they are, the more flavor they pick up, but the more quickly they will go soft, so decide how soon you are going to eat them and cut accordingly!
Add them to the brine so they are submerged.
-
Cover and let sit for a few hours or overnight or longer. Refrigerate if you're going to leave them overnight or longer.